Mastering Time A Comprehensive Guide to Video Speed Changers
- June 29, 2026
- Posted by: consultantvisanest@gmail.com
- Category: Uncategorized
Mastering Time: A Comprehensive Guide to Video Speed Changers
In the world of video editing, the ability to manipulate time is a powerful tool. Video speed changers allow creators to speed up or slow down footage, providing remarkable creative flexibility. Whether you’re editing a tutorial, a vlog, or an action-packed sequence, mastering video speed changes can elevate your projects. Explore how to effectively use a video speed changer https://cliptools.net/en/video-speed-changer/ in your editing process and unlock new possibilities.
What is a Video Speed Changer?
A video speed changer is a software tool or online application that enables users to adjust the playback speed of video files. This can mean speeding up the footage to create fast-paced action or slowing it down for a dramatic effect. Video speed changers are often found in video editing software and can range from simple tools to advanced applications with various features.
Why Use a Video Speed Changer?
Changing the speed of your video can serve several purposes:
- Time Management: Speeding up footage can condense long demos or tutorials, making them more engaging and easier to follow.
- Creative Effects: Slow-motion effects can add drama to scenes, making moments feel more intense or significant.
- Highlighting Details: Slowing down specific parts of a video allows viewers to absorb intricate details they might miss at normal speed.
- Improving Engagement: By varying the speed, you can keep your audience captivated and maintain their attention throughout the video.
How to Use a Video Speed Changer Software
Though each video speed changer has its own interface, the basic steps to modify video playback speed remain relatively consistent. Here’s a simple guide:
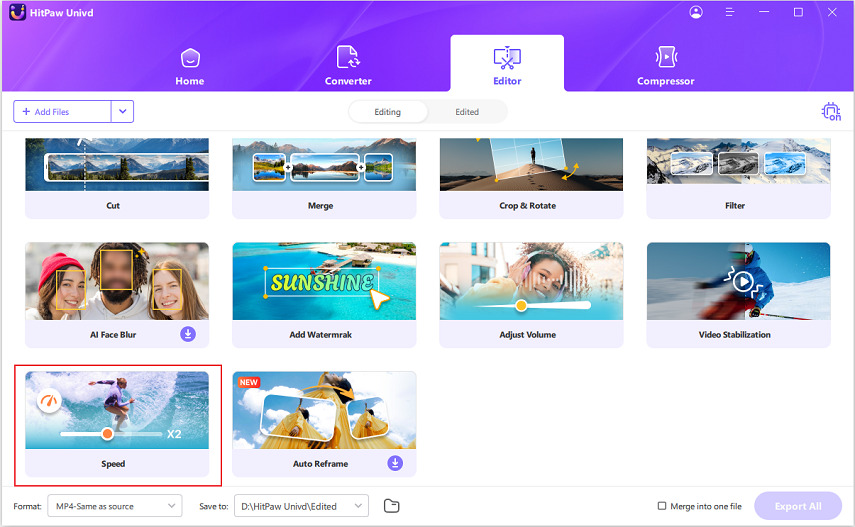
Step 1: Choose Your Video Speed Changer
Select a video speed changer that suits your needs. Several options exist, including online tools, mobile apps, and desktop software. Popular choices include iMovie, Adobe Premiere Pro, and various online platforms like ClipTools.
Step 2: Upload Your Video
After selecting your tool, the next step is to upload the video file you wish to edit. Most platforms support various formats, so check for compatibility.
Step 3: Adjust Playback Speed
Once your video is loaded, look for the speed adjustment settings. You can usually find a slider or a numerical input where you can specify the new playback speed. Common options include:
- 2x Speed (double the normal speed)
- 0.5x Speed (half the normal speed for slow motion)
- Custom Speed settings for more precise adjustments
Step 4: Preview Your Changes
Always preview the edited video before finalizing. This allows you to see how the speed changes impact the content and make any necessary adjustments. Ensure that audio sync remains intact, especially when changing speeds significantly.
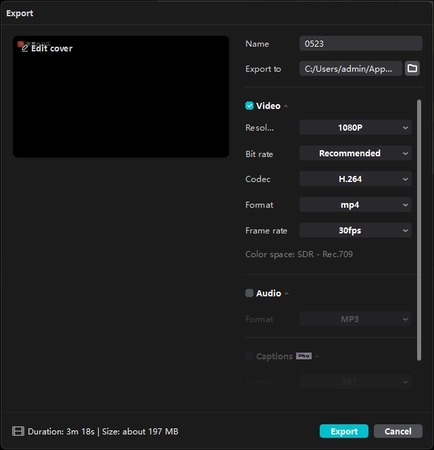
Step 5: Export Your Video
Once satisfied with the speed adjustments, you can export the video. Choose your preferred format, resolution, and quality settings to ensure the final product meets your requirements.
Best Practices for Using Video Speed Changers
To achieve the best results when changing video speeds, consider the following practices:
- Use Speed Changes Sparingly: Excessive speed changes can distract viewers. Use them purposefully to enhance your story.
- Consider the Music: If your video includes music, adjustments in speed will also affect audio. Choose tracks that can accommodate changes in tempo.
- Maintain Quality: Higher speed changes can sometimes lead to a loss of quality. Ensure your video remains sharp and clear throughout the editing process.
- Experiment with Effects: Try combining speed changes with other effects, such as cuts or transitions, to create dynamic sequences.
Common Mistakes to Avoid
While working with video speed changers, avoid these common pitfalls:
- Rushing the Edit: Take your time to ensure smooth transitions. Quick edits can lead to choppy footage.
- Ignoring Audio Quality: Watch out for distortion or imbalances in the audio track that can result from speed changes.
- Neglecting the Story: Ultimately, the video should tell a story. Avoid alterations that detract from the primary narrative.
Conclusion
Utilizing a video speed changer opens up a world of creative possibilities for any video project. Whether you’re aiming for fast-paced excitement or the elegance of slow motion, mastering these tools can significantly enhance your storytelling capabilities. By following best practices, avoiding common mistakes, and experimenting with various techniques, you can create captivating content that resonates with your audience. Dive into the world of video speed changing and see how it transforms your editing skills!